 Comment (20)
Unless you have opted for a home installation when ordering, the user may find themselves very helpless when their washing machine has arrived. To avoid disappointment, it is important to follow a few common sense tips. This avoids having to move equipment that often exceeds half a quintal several times.
Where to place it?
A washing machine does not yet feed on love, but it still needs fresh water (sometimes hot for the rare dual water washing machines) to function. It is therefore a device sensitive to frost and therefore care should be taken to place it in a sufficiently heated room. The ground on which it rests must be flat and strong enough to support its weight.
Of course, it must be near a water inlet and a drain pipe. In the case of a new home or a renovation including major plumbing work, you might as well take the opportunity to think carefully about the configuration of the installation. While it is not necessary for the two pipes to be in close proximity to each other, providing easy accessibility to the supply valve is a priority. The neighbors downstairs and the insurer will appreciate it.
People who are less DIY, or who do not wish to cut or weld pipes, can get a self-drilling or self-drilling tap that just needs to be screwed onto an existing supply pipe (after having cut the general tap of course) to have a fully functional water supply point. The same system exists for the drain pipes.
Finally, let's not forget the electrical installation. The ideal is to have a dedicated outlet to which only the washing machine is connected. Professionals do not recommend the use of an extension cord or multiple socket. As for the standards, they impose a distance of 60 cm between the water point and the electrical outlet. The lengths of the various pipes and the electrical wire of the appliance must allow you not to worry too much about following these instructions.
In the case of built-in equipment, or placed between various pieces of furniture, it is recommended to leave a space of at least half a centimeter between the sides of the machine and the furniture elements next to it. You might think that resting a washing machine on a carpeted floor to prevent vibrations or movement of the machine is a good idea: it is not. The textile fibers will be compressed very quickly and will therefore lose their anti-vibration power. In addition, in the event of a leak, however small, the carpet will soak up water, become moldy and, over time, this can cause water damage. To limit vibrations, it is better to turn to specially designed plates, taking care to take into account their thickness in the case of a device placed under a worktop.
Make way for the installation!
First of all, the conscientious user will take care to check if there is a quick installation guide. If not, these instructions can be found in the manual.
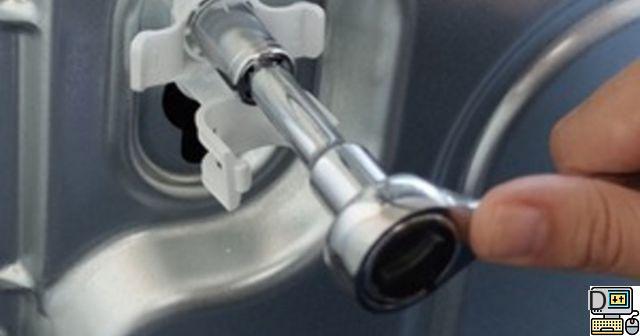
The first operation consists of disengaging, that is to say removing the wedges which prevent the drum from moving during transport. They are always removed from the back of the washing machine and are generally in the form of screws, embellished with plastic elements (removable or integral with the screw as appropriate) sometimes retaining the drain pipe and the electric wire.
There is no standardization and each builder can choose a different number, shape and size of screws. However, so far we have only encountered hex head screws, which can be unscrewed with a simple or ratchet wrench. The sizes are for their part much more variable, even downright exotic. From experience, sets of keys supplied on the market do not include a 15 mm spanner, useful for disengaging the low-linge Asko, for example. It is therefore necessary to fall back on a good old adjustable wrench.
Note that some caring builders provide the correct key. Be careful to remove all the shims - hence the importance of reading the instructions - otherwise the washing machine could be seriously damaged. A very unpleasant noise would also sanction an oversight.
A few rare models adopt the steel bar solution: long metal rods run the entire depth of the washing machine and thus limit any movement of the drum. They simply dislodge by pulling on them and turning them every now and then.
Once the shims (or bars) have been removed, the openings can be plugged using the plugs provided. We recommend that you keep the locking devices in a safe place for later use in the event that the device is moved or resold.
This is the most convenient time to level the washing machine. A spirit level is essential to check that the assembly is straight. The adjustments are made using the screw feet located under the appliance.
The drum can turn freely, the washing machine is level, it must now be connected to the water outlet. Several scenarios exist. If you have a drain hose, all you have to do is place the washing machine's drain hose inside without inserting it as far as possible: 20 centimeters is enough. You can use the elbow provided to secure the assembly.
In the event that this drain does not exist on the plumbing, the elbow is used to fix the drain pipe to a sink or a bathtub: a very unsightly solution, but sometimes inevitable. A small check consisting of manhandling the evacuation very lightly by pulling on it (reasonably) can avoid ending up with a flooded room; an experience lived in our test room ...
The connection to the water supply is very easy since it suffices to screw the supplied hose. Many washing machine models have a connecting hose that must be screwed to the washing machine via the angled end, then to the faucet via the straight end. On other devices, this hose is already attached to the back. In any case, be careful not to lose the gaskets provided and to screw in what must be, without forcing too much to be able to unscrew it easily if necessary, but also because the screw thread is made of plastic.
Once everything is hooked up, it's time to gently open the valves to check that the water isn't leaking - ideally before sliding the washing machine into its final place.
Finally, all you have to do is plug in the device, turn it on to check that it is perfectly powered.
If everything has gone well, all that remains is to move the washing machine to secure it in its final place.


